Friday, September 3, 2021

Daft punk Jacket

Working on the Daft Jacket 

The first thing I did when making my daft punk jacket was I bought a cheap leather jacket off eBay.

I made sure to find something that looked similar to their’s and had enough room on the back for the studs to go without messing/hitting any seams.

Some keywords I searched up were motorcycle/biker jacket and then just sifted through pics. 

Another alternative is to go to some thrift shops and get one there but sadly my state is in lockdown at the moment due to the Delta Covid strain sooooooo online it is!!

I first did some research and gathered reference pic on daft punks jackets and some other fan’s recreations. While I was researching I came across a youtube video by Mike Win on youtube describing how he made his jacket. His video contained a template that was absolutely perfect and I’ll link his video here if you want to watch it and the image link is here


I printed out Mike’s pattern with different scaling percentages and just picked the one that looked the best on the back of my jacket.

I had already bought some rivets so I just used a pen to puncher a hole in the pattern and popped them in, to see how they looked with the spacing.

For my studs I decided to use 6 mm double cap silver rivets because I want my logo will be a bit small and look proportional with my jacket seams. Normally I would recommend people use 8-10 mm rivets if they want a full-sized logo like daft punk has on their jackets.

Then I just simply poked holes in every black dot on the template, placed the template on the jacket, and used a white pen to mark the holes on the jacket.

I used my hole punch tool to punch a couple holes in my jacket and then hammed the rivets into the holes I created. I then just Repeated these steps until the entire logo was complete 

I cleaned up any leftover white pen using water and then my jacket was done!

I really liked how this turned out and I love it so much that I regularly wear it around the house and plan to wear it once clubs open up again.


Thursday, May 27, 2021

Winter Soldier Gloves


My Winter Soldier Cosplay - Gloves

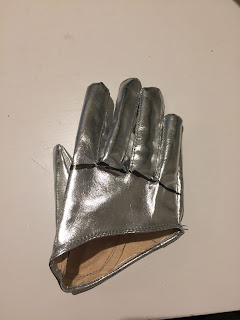
I thought I would just put a quick tutorial on how I made my winter soldier gloves. The materials I used were:

  • cheap silver party gloves 
  • basic fingerless leather gloves
  • double-sided tape/glue
  • scissors
I started with trying on the silver gloves I bought and marking where the base of each finger was. This would be where I cut later on. 

My reasoning behind this is that the party gloves were super stiff already and I couldn't move my hand very well. On top of that, they were made out of a thick vinyl that was super hot and I didn't want to wear this under another thick black leather glove.

Once you have cut out all the fingers you can either start wrapping double-sided tape around the base or applying glue. 

Put the fingers onto your hand and peel off the tape backing. Then put on the glove and squeeze each finger base to make sure it sticks on the inside.


Then Voila you now have a winter soldier glove with his metal hand in it. (You could also use the leftover
scraps of the gloves to cut small circles and glue that on the glove as well for the knuckle holes.)

The double-sided tape is strong enough that I can wear the gloves for long periods of time and move my hand a lot without it coming unstuck, but if I needed the gloves for another costume I can simply pull them out.


Friday, October 23, 2020

Padme Amidala's Aqua Georgette Nightgown


 Aqua Georgette Nightgown 


 I have finally decided to make this dress after waiting for a LONG time, but I now have the time and money to start this project. 

So the first thing I did was gather lots of research on the basics and overall construction of this costume. Most of my information came from the Padawan's Guide and another blog on this site called Costumes and Artwork so credit is due there. 

I'll also link my Google document at the end of this post, which contains all my notes and detailed instructions on how I made this project.  

So the full ensemble of this costume includes: 

  • The nightgown itself 

  • A small cape/back drape that is attached to the back of the gown 
  • Opera length embroidered gloves/sleeves 
  • A jeweled headband 
  • Night slippers/ballet flats

Looking at pictures of the dress and through research you can see that the silk satin peaks through  two pieces of georgette through a slit at the front. These photos also provide a good look at the embroidery along the dress and what areas it is needed.


Full view of the nightgown

Closer shot of the embroidery on the front of the gown.

Side shot showing embroidery on back drape and sleeves  


There isn't much information on this dress compared to others within the star wars universe so I knew this would be a bit tricky from the start. Also I decided I would start this right after I finished my HSC (year 12) so there might have to be certain compromises on accuracy. 

Also a small warning that this project is going to be very rough and have lots of mistakes as I have only been sewing for 8 months at this time. There are many techniques and information that I do not know but I still think its going to be a lot of fun!


To see my google document with more information go Here

Daft punk Jacket

Working on the Daft Jacket  The first thing I did when making my daft punk jacket was I bought a cheap leather jacket off eBay. I made sure ...